Ever wondered how you can get to your little Raspberry Pi computer when you're not right next to it? Maybe it is tucked away in a corner, quietly doing its work, and you need to make a quick change or check on things. It can feel like a bit of a puzzle, especially when there's a Windows 10 computer and its built-in security features standing between you and your tiny machine.
There are times when you just need to reach out and touch your small device from a distance, perhaps from another room or even from somewhere else entirely. This is where getting a secure connection, sometimes called SSH, becomes really useful. It lets you send commands and get information back, all as if you were sitting right there, tapping on its keyboard. It's a pretty neat trick, you know, for anyone who likes to tinker with these small, powerful gadgets.
We're going to talk about how you can set this up, even when your Windows 10 machine has its own protective wall, often called a firewall, in place. It might seem a little bit tricky at first, but with some simple steps, you can have your Pi ready to talk to you from across your home network or, with a few more adjustments, from even further away. So, basically, we'll walk through getting your Windows 10 computer to play nicely with your Raspberry Pi, allowing you to connect securely.
- Connect Iot Device Behind Firewall
- Enable Remote Access Raspberry Pi
- How Do I Access My Iot Device Remotely
- Is Barron Trump On Americas Got Talent
- Aws Iot Remote Access
Table of Contents
- Why Connect to Your Raspberry Pi from Afar?
- What's the Deal with Firewalls and Windows 10?
- How Do You Set Up Your Raspberry Pi for SSH Access?
- Can You Really Reach Your Pi Through a Router?
Why Connect to Your Raspberry Pi from Afar?
There are many good reasons why someone might want to control their Raspberry Pi without having a monitor or keyboard directly plugged into it. For instance, maybe your Pi is set up as a little home server, perhaps handling your media files or running a small website. You don't want to drag a screen and input devices over every time you need to make a small adjustment, do you? It's just a lot easier to sit at your main computer, like your Windows 10 machine, and send commands over the network. This way, your Pi can be tucked away somewhere out of sight, doing its job quietly. This sort of remote control, is that, a really convenient way to manage your small computers.
Another reason people like this kind of setup is for projects that need to run continuously, without much human interaction. Think about a weather station that sends data, or a security camera system. You set it up once, and then you only need to check in occasionally to see if everything is working right, or to update the programs. Being able to connect securely, often called SSH, means you can check on these projects from your desk. It saves a lot of time and effort, making these little computers even more useful for all sorts of things, in a way, it gives you a lot of freedom.
People also use this remote connection method for learning and experimenting. If you're just starting out with coding or Linux, having your Pi accessible from your main computer means you can try things out without constantly moving cables around. You can copy files back and forth, run scripts, and see the results all from one spot. It makes the whole process much smoother and more enjoyable, honestly. It's like having a little lab setup right on your desk, and you can get to it whenever you need.
- Bianca Censori Plastic Surgery
- Blake Blossom Secret
- Raspberry Pi Enable Remote Access
- Raspberry Pi Remote Console App
- Savannah Bond
Getting Started with Remote Access via SSH to Raspberry Pi
To begin using this handy remote access, you'll want to make sure your Raspberry Pi is ready to accept these secure connections. It's a pretty straightforward process, but it's a very important first step. Think of it as putting a welcome mat out for your computer to find your Pi. You'll typically do this when you first set up your Pi's operating system, or you can turn it on later using a simple command. This secure shell, or SSH, is a way to create a private channel between your Windows 10 computer and your Pi, so you can send instructions back and forth safely. It's almost like having a secret handshake between the two machines.
Once your Pi is set up to listen for these connections, the next part involves your Windows 10 computer. Modern versions of Windows actually have the tools you need built right in, so you don't have to go looking for extra programs. This makes things quite a bit easier than they used to be. You can open up a command prompt or a similar window and simply type a few words to tell your Windows machine to try and connect to your Pi. It’s that simple, more or less, to get the conversation going between them. This method works for anyone, whether they are just starting out or have been doing this for a while.
The key to making this work is knowing your Raspberry Pi's address on your home network. Just like your house has a street number, your Pi has a number on your network that helps other devices find it. You can usually find this address by logging into your router's settings, or by running a command directly on your Pi if you have a screen connected. Knowing this address is how your Windows 10 computer will know exactly where to send its connection request. Without it, your Windows computer would be shouting into the void, so to speak, hoping your Pi hears it.
What's the Deal with Firewalls and Windows 10?
Windows 10, like many modern operating systems, comes with its own built-in protective barrier, often called a firewall. This firewall is there to keep your computer safe from unwanted visitors or harmful programs trying to get in from the internet or other networks. It acts like a security guard, checking every piece of information that tries to come into or go out of your computer. This is a good thing for your overall safety, obviously, but sometimes it can be a bit too protective, stopping connections you actually want to happen. So, you might need to give it a gentle nudge.
When you want to connect to your Raspberry Pi using SSH, your Windows 10 firewall might see this as an unusual incoming connection and block it. It's not trying to be difficult; it's just doing its job of keeping things secure. To allow your SSH connection to work, you'll need to tell the firewall that this specific type of connection, on a particular "doorway" or port number, is okay to let through. It's like telling the security guard, "Hey, this person is supposed to be here, let them pass." This adjustment is fairly common for anyone setting up network services.
You typically don't need to turn off your entire firewall to make this work, which is good news for your computer's safety. Instead, you just create a small exception, a rule that says "allow traffic on this specific port for this specific program." This keeps the rest of your computer protected while still letting you connect to your Pi. It's a balance between security and usability, and Windows 10 gives you the tools to strike that balance. Honestly, it's a pretty smart way to handle things, allowing you control over what gets through.
Making Space in Your Windows 10 Firewall for SSH
To make room for your SSH connection through your Windows 10 firewall, you'll need to open up the Windows Defender Firewall settings. You can usually find this by searching for "Firewall" in the Windows search bar. Once you're in those settings, you'll look for an option to "Allow an app or feature through Windows Defender Firewall" or something similar. This is where you tell Windows about the kind of connection you want to permit. It's a bit like adding a new entry to a guest list, so to speak, for your network traffic.
Within that section, you'll want to find the entry for "SSH Client" or "OpenSSH Client." If it's not already there, you might need to add a new rule. This new rule will specify that any incoming or outgoing connections using the SSH protocol, which typically uses port 22, are allowed. You'll usually choose to allow this for "Private" networks, which covers your home network, and maybe "Public" if you plan to connect from outside your home, though that requires extra care. So, you're giving a specific permission for a specific kind of talk.
After you've set up this rule, your Windows 10 machine should be much more welcoming to your SSH attempts to reach your Raspberry Pi. It's a one-time setup for the most part, unless you make big changes to your computer's network settings. Just remember to save any changes you make in the firewall settings. This small adjustment makes a very big difference in getting your remote connection to work smoothly. It's basically saying, "Okay, firewall, you can relax a little for this particular type of connection."
How Do You Set Up Your Raspberry Pi for SSH Access?
Before you even think about connecting from your Windows 10 computer, your Raspberry Pi itself needs to be ready to accept SSH connections. This is a pretty simple step, but it's absolutely necessary. When you first install the operating system, like Raspberry Pi OS, SSH might not be turned on by default. It's a security measure, as leaving it open could potentially allow unwanted access if your Pi is not properly secured. So, you have to tell your Pi, "Hey, I want you to listen for these secure remote connections."
There are a couple of common ways to get SSH going on your Pi. One way is to enable it during the initial setup of the operating system. Many imaging tools, like Raspberry Pi Imager, have an option to pre-enable SSH before you even put the operating system onto the SD card. This is arguably the easiest method if you're starting with a fresh installation. You just check a box, and the system handles the rest. It's quite convenient, actually, for getting things ready without much fuss.
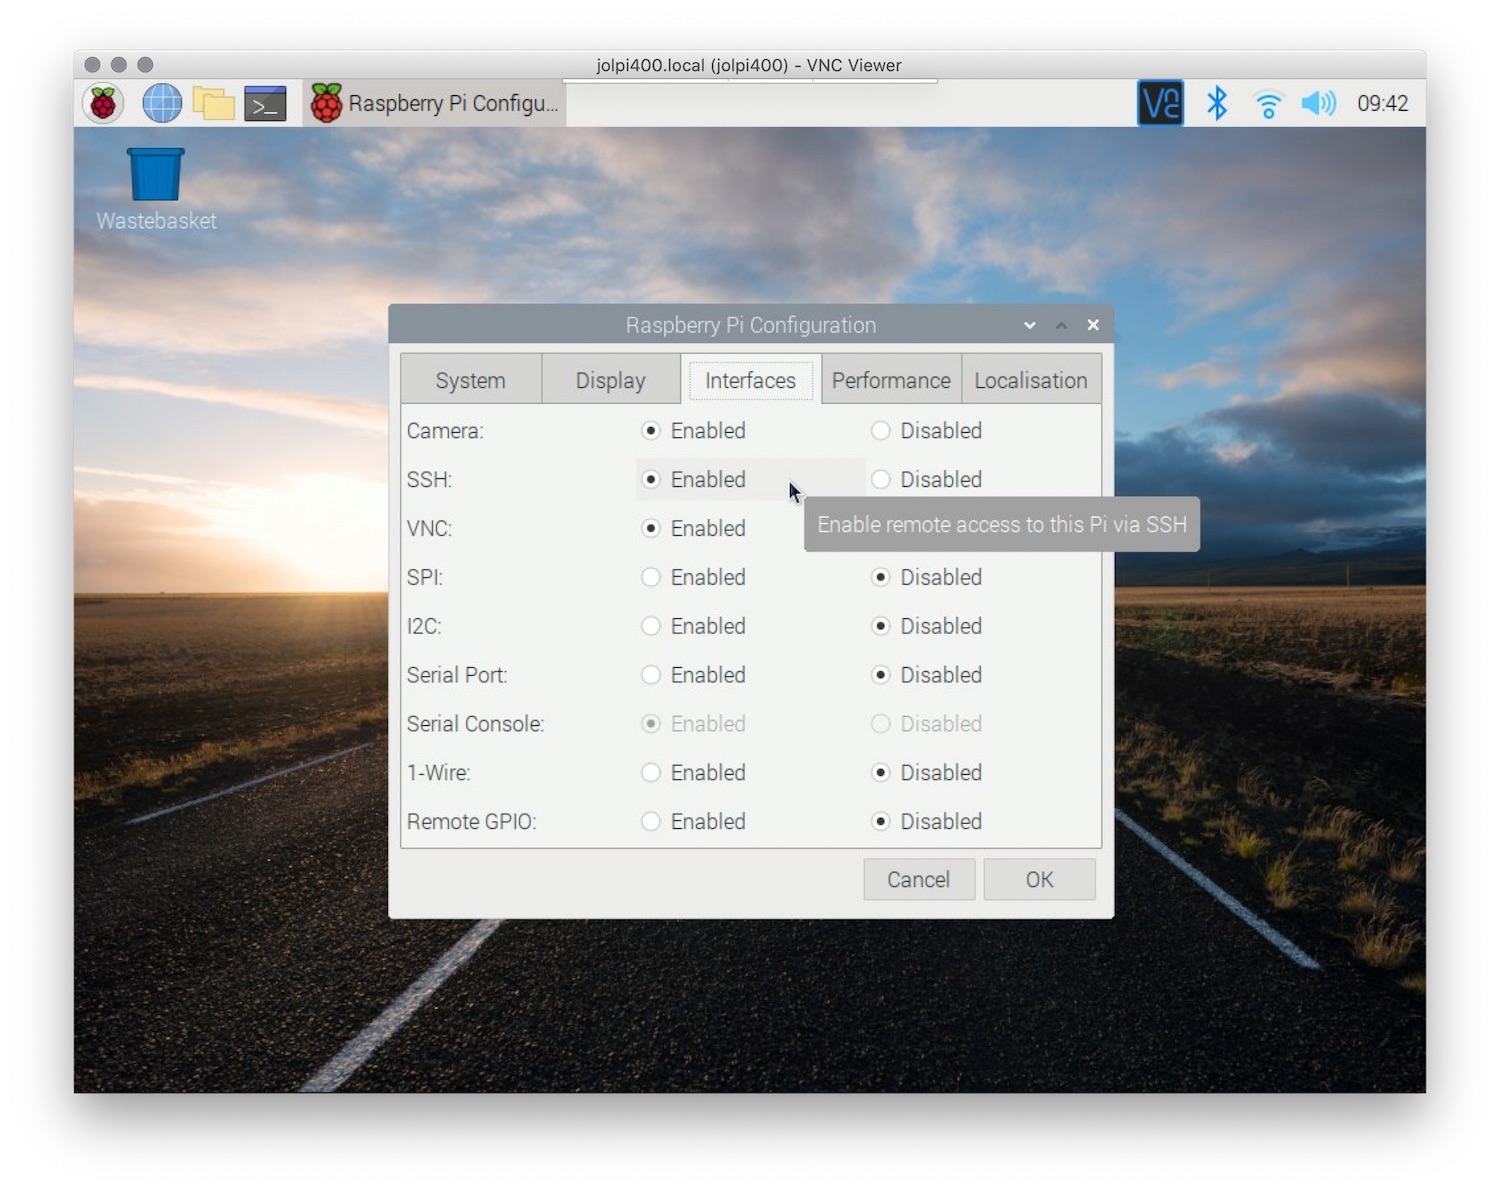
If your Pi is already up and running, you can enable SSH directly from the Pi itself. If you have a monitor and keyboard connected, you can go into the Raspberry Pi Configuration tool, which is usually found under the Preferences menu. Inside there, you'll find a tab called "Interfaces." Just tick the box next to "SSH" to turn it on. Alternatively, you can open a terminal window on your Pi and type a simple command: `sudo systemctl enable ssh` and then `sudo systemctl start ssh`. This tells the Pi to get its SSH service running. So, you have a few ways to get this done, depending on your setup.
Preparing Your Raspberry Pi for Incoming SSH Connections
After you've enabled the SSH service on your Raspberry Pi, it's a good idea to check that it's actually listening for connections. You can do this by opening a terminal on your Pi and typing `sudo systemctl status ssh`. This command will show you if the SSH service is active and running. If it says "active (running)," then you're in good shape. If it shows something else, you might need to troubleshoot a bit, but usually, the previous steps are enough to get it going. This verification step is a pretty quick way to make sure everything is in order.
Another thing to consider when preparing your Pi for SSH is its network address. As mentioned before, your Pi needs a consistent address on your network so your Windows 10 computer can always find it. Sometimes, routers give out temporary addresses, which can change. To avoid this, you can set a static IP address for your Pi within its network settings, or you can configure your router to always give your Pi the same address. This makes connecting via SSH to Raspberry Pi behind firewall Windows 10 much more reliable, as you'll always know where to find it.
Finally, and this is a really important security point, make sure your Raspberry Pi has a strong password for its main user account, usually "pi." When you connect via SSH, you'll use this username and password. If the password is too simple, someone else on your network, or even from the outside if your router is set up for external access, could potentially get in. Changing the default password is one of the first things you should do when setting up any new Pi. It's a small step that offers a lot of protection, so, basically, don't skip it.
Can You Really Reach Your Pi Through a Router?
Yes, you can absolutely reach your Raspberry Pi through a router, and this is how most home networks are set up. Your router acts like a central traffic controller for all the devices in your home, directing internet traffic to the right computer and managing communication between your local devices. When you connect via SSH from your Windows 10 computer to your Raspberry Pi on the same home network, the router is usually just passing that information along, almost like a friendly postman. It's a pretty common way for devices to talk to each other inside your home.
However, if you want to connect to your Raspberry Pi from outside your home network – say, from a coffee shop or a friend's house – things get a little more involved. Your router also acts as a gatekeeper to the internet. By default, it blocks most incoming connections from the outside world to protect your home network. To allow an SSH connection from outside, you'll need to set up something called "port forwarding" on your router. This tells the router, "Hey, if something comes in on this specific port, send it to my Raspberry Pi." It's a bit like telling the postman to deliver a specific letter directly to your Pi, even if it came from far away.
Setting up port forwarding means you're essentially opening a specific "doorway" in your router's firewall for your Raspberry Pi. This door is usually port 22 for SSH. It's important to be careful when doing this, as opening ports can sometimes create security risks if not done properly. Always make sure your Pi has a very strong password, and consider using SSH keys for even better security, rather than just a password. This extra step helps keep your Pi safe from unwanted visitors when it's exposed to the wider internet. So, while it's possible, it does require some thought about safety.
Opening Ports on Your Router for via SSH to Raspberry Pi Behind Firewall Windows 10
To open a port on your router for your Raspberry Pi, you'll need to log into your router's settings page. You usually do this by typing your router's IP address into a web browser on your Windows 10 computer. Common addresses are something like 192.168.1.1 or 192.168.0.1. Once you're logged in, you'll look for a section related to "Port Forwarding," "NAT," or "Virtual Servers." The exact name can vary a lot depending on your router's brand and model, which is that, sometimes a bit frustrating, but the general idea is the same.
Within the port forwarding section, you'll create a new rule. This rule will typically ask for a few pieces of information. First, you'll specify the "External Port" or "Public Port," which is the port number from the internet side – usually 22 for SSH. Then, you'll enter the "Internal Port" or "Private Port," which is also 22, as that's the port SSH listens on your Pi. You'll also need to tell it the "Internal IP Address" of your Raspberry Pi, which is why having a static IP for your Pi is so helpful. Finally, you'll select the "Protocol," which for SSH is usually TCP. This basically tells your router exactly how to direct incoming requests.
Once you've saved these settings on your router, it should start directing any incoming SSH connection requests on port 22 directly to your Raspberry Pi. This means you can then use an SSH client on your Windows 10 computer, or any other computer with an internet connection, to reach your Pi. It's a pretty powerful setup, allowing you to manage your small computer from almost anywhere. Just remember, whenever you open a port to the internet, you are making your device a little more visible, so security measures on your Pi become even more important, in a way, it's like putting a sign on your door.
Related Resources:


Detail Author:
- Name : Bradford Goodwin
- Username : leannon.domenica
- Email : zula18@gmail.com
- Birthdate : 2000-03-31
- Address : 4346 King Streets Suite 576 Riceborough, IA 03350
- Phone : +1-352-600-7807
- Company : West Inc
- Job : Landscape Architect
- Bio : Est fugit aut quia et eius. Ut pariatur omnis reprehenderit praesentium. Dolores dolores magnam nulla placeat eaque omnis soluta nulla. Non sed ut optio aliquam nobis.
Socials
tiktok:
- url : https://tiktok.com/@winnifred.lehner
- username : winnifred.lehner
- bio : Aut maxime rerum cum dolorem est nam.
- followers : 3902
- following : 2232
instagram:
- url : https://instagram.com/winnifred_official
- username : winnifred_official
- bio : Occaecati aliquid illo autem veritatis. Aut fugiat doloribus eligendi quos eos.
- followers : 6337
- following : 2429
facebook:
- url : https://facebook.com/winnifred_dev
- username : winnifred_dev
- bio : Ipsam voluptatem nemo asperiores omnis aut.
- followers : 3359
- following : 2101
